Hopper Game (on progress)

This post will record the progress on Hopping Game I play with my friend Vari.

Hopper game is the game where the first person sees an object and they describes it to the second person by words, and the second person describes to the third person, and so on. When it reaches the last person, the original object will be shown to all players, and they can see how far the original object has change through words.

This hopper game is the same, but using drawings instead of words.

I will edit this post according to our progress, until the game ends.

March 28, 2015

So, to start my friend Vari draw this image first

Vari001

I was thinking this picture is so lonely without colors, and lately I’m crazy about watercolor. The petals in the picture looks like butterflies, so I want to add butterflies too.

This is what I came up with 🙂

Jar of Dreams - B - edited - small

I thought the vase can become a magic jar which butterflies come out. And I drew the woman as though she is floating in the sky. Maybe she is a dream fairy ;D

March 29, 2015 (Morning)

This morning Vari came up with another picture

Vari002

I have another idea to continue this picture. Or anyone want to continue it too? 😀

Update : March 29, 2015 (Night)

Ok so another one from me ;P

At first glance I thought Vari drew a mermaid, but then I noticed it’s not an underwater scene. But the grasses on the left look like underwater plants, right? right?

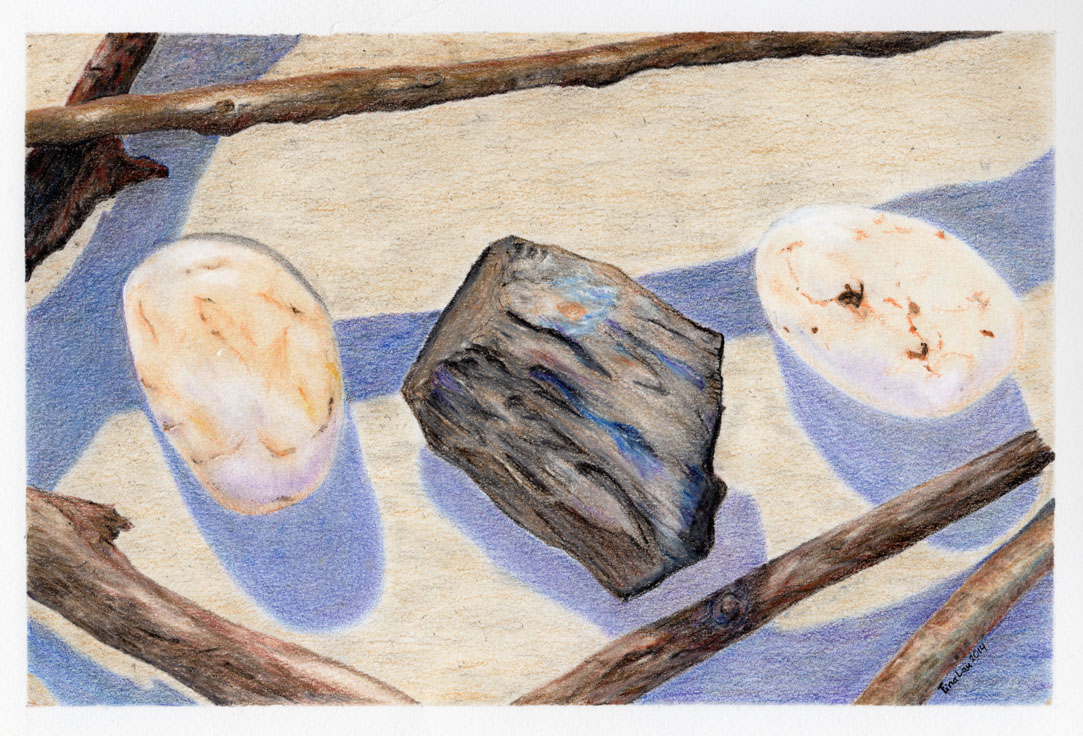
So, the idea of an underwater painting was on my mind, and this is the result:

Mermaid

A mermaid peeked out behind the rocks. She wore a crown made of moonstone and pearls. Was she smiling or was she frowning?

The legend said mermaids are beautiful creatures, but beware, for the are deceivers. You have to be aware when you meet one, don’t let her beauty drag you deep into the water.

I think I will stop at this picture for the moment, and wait if anyone else want to continue 🙂

Painting on the go

I wanted to send a card to a friend, but I haven’t come up with a good idea. So, at last moment, before going to the post office, I stamped a frog and a talk bubble on a  postcard from Maruman Watercolor Postcard Pad (so far only this product from Maruman that’s really worth its price). There’s a really nice picnic table behind the post office where I quickly add watercolor to the card.

IMG_20150326_115124sml

For some reason my phone camera always lost focus on the frog in every pics I took. Poor frogie…

IMG_20150326_115240sml

Today’s art shopping

I just can’t resist myself when I visit my favorite art supply store. The store is small but filled with many delicious choices for any kind of art and craft needs, and it has the best price compared to all art supply stores in my country (at least that I know of ;P ). The stores even sell Derwent product far cheaper than in the Derwent online store.

It’s rare to find a 300gsm watercolor paper that is affordable for an amateur watercolor enthusiast like me. So when I saw Canson XL Mix Media pads I grabbed it immediately. I asked the clerk if they have the XL watercolor pad, but they said they only have Reeves, and so I grabbed that too. That was a blind buy as I haven’t read any review of Canson XL Mix Media pad before. Now that I am home and have access to google, I found that the reviews are not that good for their Mix Media paper. People who reviewed it said that the paper could not hold a lot of water. Oh no, will this be a waste….. I like using wet on wet techniques, but most reviews were for the 160gsm pads. Hopefully the 300gsm is better to hold water and still be a good use to me.

Another blind buy was Pentel Arts Watercolour Set. My Reeves set is beyond use and need retirement. As far as I know Pentel is a quite good brand for student. The reviews I found on the net are quite good. It is compared to the same level as Sakura Koi Watercolor. I probably will try the Canson Mix Media paper and the Pentel watercolor soon, as soon as I finished my current project.

IMG_0061small

Colored Pencil Magazine October Art Challenge

Finnaly, I decided to take a drawing challenge from Colored Pencil Magazine. CPM always have a drawing contest every month with different theme each time. The October month’s theme is stick and stones. I decided to do this challenge just a week before deadline. It turned out the photo provided was more complicated than I thought it would be. Colored pencil is not my favorite medium. I remember how awful my pencil color drawings were from the time I was in school. But since one of the rules for this contest is to use colored pencil, I have to dig tips and techniques to make a good colored pencil drawing. I look for tutorials around the web, just the simple basic one so I can follow them. I found one tutorial that really helps me to get around on painting stones. The explanations there are easy to follow. (How to Paint Nature’s Bounty using Derwent Coloursoft Pencils by Graham Brace)

Following the tips on the tutorial, I drew a fairly acceptable drawing. I actually learned a lot by drawing this. So if you see that the top part looks to be drawn on different ways than the bottom part, that’s because it is. I experimented on how to make something looks as close to the real photo as possible.

I’m quite proud of my finished drawing. Maybe not the best amongst the other contestants, but at least I manage to finished it before deadline. And I also managed to get quite a few techniques because of this challenge.

CPM OKT 14 - Fina Lau - 25%

Drawn using Derwent Coloursoft on Canson Drawing paper

Making My Own Unique Letter Set

One of the thing I like is sending letter to my friends. Since my friends and I always try to send the most cute or unique letters to each others, I don’t want to buy the standard paper and envelope type that are sold in stores. So mostly I decided to make my own letter set.

A few days ago I found a beautiful paper pad on crafting supplies store. It was 6×6 Forever Green Paper Pad by Prima Marketing INC. The store sold this pad at a cheap price, probably because one corner is a little bit wonky.

IMG_5820-25%

The pad has a blackboard theme with contrasting pictures that seems to pop out of the paper. I chose one with butterflies pictures on one side and the other side just black with thin borders of shrubbery.

IMG_5823-25%

I folded a square piece of paper for the letter and glued the little square to the background paper. I have this grey tinted paper that looks in tone with the background.

I took a smiley card from a cafe the day before and used it to be a sort of seal for the folded paper.

I glued the upper left corner of the smiley card to the paper and put a ball of tack-it on the center to seal the letter. Actually for this I used a piece of kneadable eraser instead of tack-it, not as ideal but it has the same sort of stickiness. I put instruction on how to open it on the bottom corner of the smile card. I didn’t want to reveal the contents of my letter right away, but put an air of mystery to it.

As you can see the letter has an effect that I want.

I sort of experimented with the way to fold the paper so it looks nice and easy to open.

IMG_5824-editedIMG_5825-edited

I made the envelope with the same paper I used for the writing paper, sprayed with different colors of ink. I forgot to take a picture of it before I mailed the letter, but basically just making a pocket that can fit my letter.

I hope my friend will love it when she got my letter 😀

Drawing from tutorial

I found this cute tutorial about drawing flowing looking goldfish from thefrugalcrafter Lindsay Weirich. I thought that it looks quite easy to follow, and so I tried it.

I experimented using only Derwent Inktense Pencils, since I’m still not used to using Inktense.

It turned out that once I get to know the characteristic of Inktense, it’s not much different than using watercolour. I had so much fun doing this goldfish that I put more colours on the fish.

Goldfish-sm

For those who want to watched the tutorial, this is the link: https://www.youtube.com/watch?v=ZUKGj50AV60&list=UU_pR1d2QM9MlashFgTbJQlw

New project – Wire Jewelry

While I looked around for gemstone and their meaning, I stumbled across pictures of Wire Jewelry with gemstones on it. They look so beautiful. The wire twisted to make swirly frame for the gemstone, really I just can’t resist sparkly and shiny things. Especially those which I can make on my own. So, I browse through my favorite online craft supply store. No need to guess, I ended up with a haul of necessary item to make basic wire jewelry. Luckily I already have some tools needed from my earlier polymer clay obsession. While I wait for the wire spool and gemstones to arrive, I drew some design sketch for my wire project.

This one is my design for Aventurine and Iolite pendant. Hopefully it’s possible to make it like I draw it.

IMG_5710-wire pendant